This is a guide which shows you the steps taken to create the C# example for the Instant Protection PLUS 3 DLL.
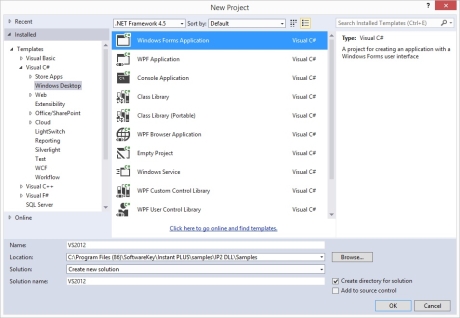
Open Visual Studio, click File, then New, and then Project... Select the Visual C# Windows project type on the left, and then select Windows Forms Application on the right. For integration with an existing project, this step may be skipped.
The sample code distributed with Instant Protection PLUS 3 includes a class file for calling the native DLL. While you are not required to use this class specifically, we strongly recommend it as it includes some basic exception handling for you. To add this file, click the Project menu and click "Add Existing Item..." as shown below. Browse to the installation directory (usually C:\Program Files\SoftwareKey\), go to the "Instant PLUS\samples\IP2Lib DLL\Samples\Microsoft .NET\Windows.Forms\CSharp\IPSample" sub-directory, and select the "IP2Lib.cs" file.

Once added, the file will show up in the Solution Explorer (which can be seen on the screen shot in the next step below, on the right) and should have been copied to your projects directory (keep this in mind, as editing this separate copy will not affect other projects which contain their own copy).
Add a using statement to the beginning of your source code as shown in the screen shot below.
You will now need to generate some code to use with your application. You can obtain the C# code shown below with the return key/return code and Decryption Key specific to your .ipp file already in place by using the Instant Protection PLUS 3 DLL Integration Assistant. To use this method simply: Run Instant Protection PLUS 3 DLL Integration Assistant. Select the language that your application is coded in (in this sample we are using C#). Select your applications .ipp file. Click "Generate" and then click "Copy" to save the code to your clipboard. Here is a sample of what the interface should look like.

You will notice that, in the screen shot below, there is a tab named "Form1.cs [Design]." If this tab is not already open, you may get to it by double-clicking on Form1.cs in the Solution Explorer on the right. Click this tab and then double-click on your form. This will generate the Form1_Load event handler code (the code that reads, "private void Form1_Load...").
Paste the code from the Instant Protection PLUS 3 DLL Integration Assistant into the Form1_Load event handler method as shown in the screen shot below:
Once you have this code in place you may proceed to step 4.
As an alternative to using the Instant Protection PLUS 3 DLL Integration Assistant you can copy the code below and paste it into the Form1_Load event handler method as shown above. If you choose to copy the sample code below be sure to follow the important steps to make the appropriate changes.
The source code modifications have been made, the required project property changes have been made, and the only thing left to do is to compile and run. If this is the first time you are building your project, you can build the project first. Once you have successfully built, make sure you copy the XML file you saved from the Instant Protection PLUS 3 wizard's File Output step to the appropriate build directory.
For example, if you are compiling the Debug build, you will need to copy the XML file to the Debug directory where the compiled program is located. Likewise, you will also need to do this for your Release build and any other build configurations you might create. Once the XML file is in the same place as your program, you can run it and test.
When your .NET application is compiled, it is compiled to what is called Microsoft Intermediate Language (MSIL - pronounced like "missile") code. There are tools that can be used to translate and reverse engineer MSIL code, so it is imperative that you select and use an obfuscation tool to further protect your application and your investments in it. Microsoft offers a good summary of this subject.
The application must be properly deployed in order to function correctly on a 'clean' machine that has not previously had Instant Protection PLUS 3 installed. The Instant Protection PLUS 3 DLL library files must be installed either to the application directory or the system directory, along with any custom splash screen or product logo images. These requirements and other details are described in the Deployment topic.