This tutorial is designed to demonstrate the features of Instant Protection PLUS 3 using the distributed Demo Application. The Demo Application may be provided by SoftwareKey in order to experience our licensing system in action without needing Instant Protection PLUS 3 installed.
You can download the Demo Application here. It is a .zip file that contains an EXE and two image files.
For those who have Instant Protection PLUS 3 installed, the protected Demo Application can be found in the Instant Protection PLUS 3 installation folder. By default this is:
At install, a shortcut to the Demo Application is added to the SoftwareKey Licensing System folder in the Windows Start Menu. The Demo Application is a standard 32-bit native Windows application created with Microsoft Visual Studio.
The Demo Application is already protected using Instant Protection PLUS 3 to demonstrate many features. By completing this tutorial you will:
Launch the Demo Application executable. If you have Instant Protection PLUS 3 installed, you may launch the application from the Windows Start Menu under SoftwareKey Licensing System / Instant Protection PLUS 3 Demo Application
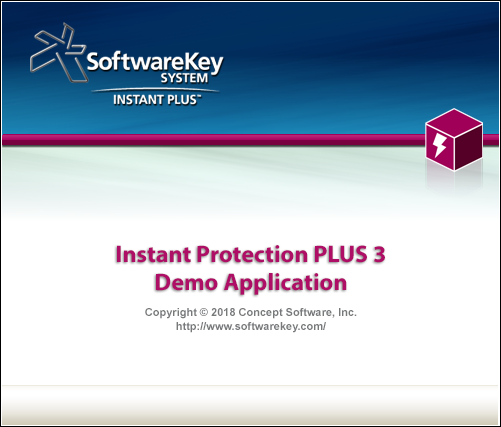
At start up, the application will show a splash screen if the demo_application_splash.bmp file is present in the same folder. Showing a splash screen is one of the options that can be configured when protecting your application.
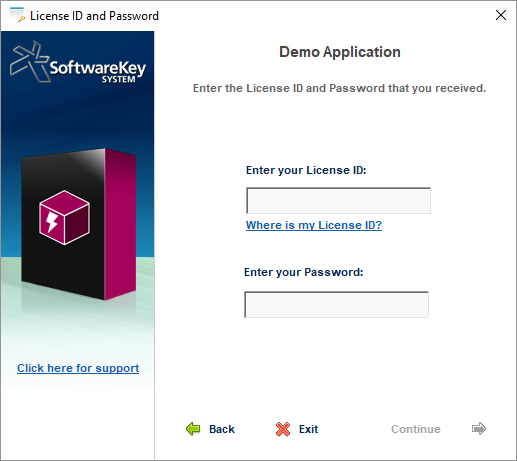
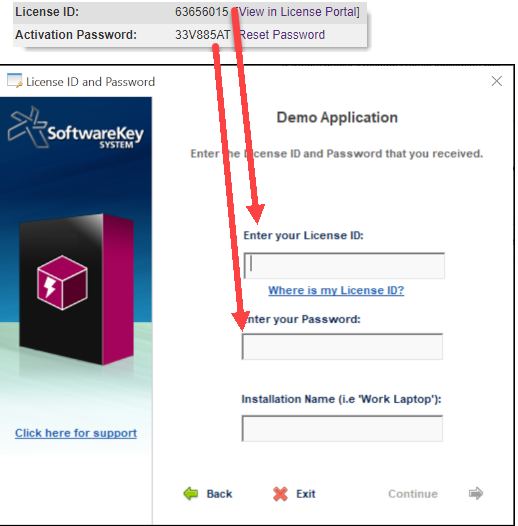
Once the splash screen has been shown, the initial licensing dialog window is displayed.
This is the first licensing dialog window your customers will see. Clicking the Purchase Demo Application Online link will open the browser to the SOLO Server shopping cart with the product already in the cart. The SOLO Server shopping cart appearance may be customized to match the appearance of your website. You can preview the default shopping cart Purchase link if you are logged into SOLO Server.
The image on the left of the dialog is displayed if the ip_prodlogo.bmp file is in the same folder as the application. This image may be easily replaced with your own logo.
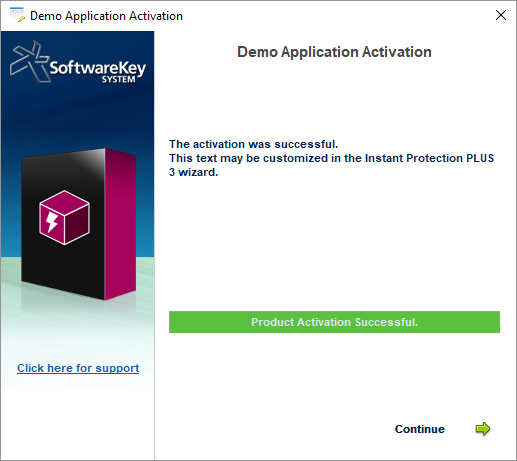
We don't want to evaluate the application in this tutorial, we want to activate it! We will do just this in the next tutorial step.
Go ahead and click the Activate Demo Application button.
You will now be presented with new options.
We are only going to demonstrate the online activation method in this tutorial. When protecting your own application, you can choose which activation methods your customers may use. For example, you can only allow manual activations if you only want to allow your customers to activate by phone or email. Any activation options you disable will not be shown on this dialog.
Click the Activate Demo Application Online button. You will see the following dialog window.
You are probably asking yourself, "What is a License ID and how do I get one?" Each license generated in SOLO Server has a numeric License ID and alphanumeric Activation Password. The License ID and Activation Password need to be provided to the customer so that they can activate your application. SOLO Server will validate the License ID and Activation Password they enter and activate your application. If you use the SOLO Server shopping cart, the entire process is completely automated without the need for you to be involved!
Now we need a License ID and Activation Password.
In order to create the test license we will need, we must login to SOLO Server's test author account.
Open this login link in your browser:
Use the following credentials to login to the SOLO Server test author account:
User ID: test
Password: test
Once logged in you will be taken to the SOLO Server Author Home page. While there is a lot to explore in SOLO Server, for this tutorial we only want to create a test license so we may activate our application.
Our customers who use SOLO Server to manage their product's licensing are called "authors" or "SOLO Server authors". When using SOLO Server you will see the "author" term used throughout the product and documentation.
As a SOLO Server author, you will need an easy way to test your applications licensing. We have added this ability with "test licenses". A test license works just like a real license except all test licenses are purged from the system at the start of each month. In addition, no fees are applied to creating or activating test licenses. Creating a test license is extremely simple.
In the SOLO Server menu select Cutomers / Add a Test License.
A list will be shown with all the products available for adding a license. Select the Instant Protection PLUS 3 Sample 90 Day License from the list. Click the Add New Test License button.
Click OK on the informational pop-up.
You have just created a 90-day subscription test license in SOLO Server! You are automatically directed to the License Details page for this license.
We now have the License ID and Activation Password needed to activate our protected application as a 90 day subscription. Leave this browser window with the license information open as we will want to use the activation information in the next step.
Now we are all ready to activate the application.
Enter the License ID and Activation Password from the license record in SOLO Server into the application's activation dialog we had left open in step 2 then click the Continue button.
Congratulations! You have just activated the application with a subscription license. Click the Continue button on the activation dialog.
This application license will now expire in 90 days.
Instant Protection PLUS 3 has an option to check for a new subscription date when the application is expired or within a defined number of days before expiration. The wrapped Demo Application has this feature set to 7 days. This allows the software to automatically get a new expiration date in case the customer has purchased a subscription renewal. If there is a new date, it will automatically update the local license file with that date and continue working seamlessly.
Return to the test license created in SOLO Server. Note on the right side of the license the Download Until Date. This is the date the subscription license was set to expire (and it also doubles as a download access expiration date).
Select Edit from the License drop down.
Find the Download Until setting and update it to a future date. At the bottom of the page click the Submit button.
The local license file is still set to expire on 4/13/2019, so on 4/6/2019 (7 days before expiration) it will start checking for a new expiration date and automatically be updated to 8/13/2019.
This manual process of updating an expiration date can be done on any license, but SOLO Server also supports automated ways of updating licenses. With our integrated eCommerce, a customer can simply buy a license subscription renewal, and it will automatically update the existing license expiration when payment is received. SOLO Server also supports automatically recurring billing.
We suggest you now reset the licenses for the Demo Application. The Resetting Licenses while Testing tutorial will demonstrate how this is done or return to the Tutorials Overview topic.