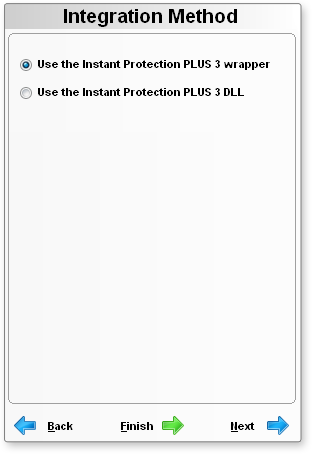
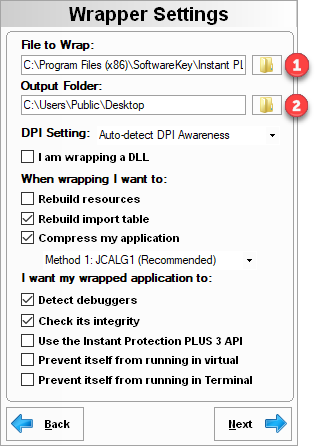
This is where we choose which Instant Protection PLUS 3 options to use when wrapping the application. Select the same options from the screen shot below. As the tutorial continues, we will describe the options selected when reaching the wizard step for each option.
Click Next.
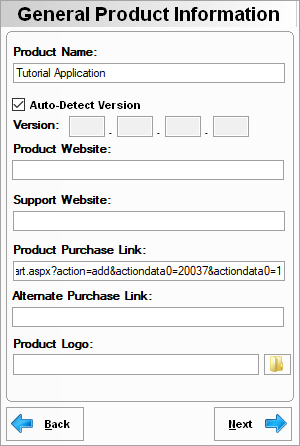
When synchronizing, Instant Protection PLUS 3 retrieved the name of the Product from SOLO Server and filled in the Product Name setting for us. This is the name of your product that is shown on the activation dialogs. You can modify the name as you see fit and it will not affect the synchronized data. Change it to "Tutorial Application".
Under Product Website enter www.softwarekey.com. When there is a value for the Product Website, the activation dialogs will show a "Go To Website" link that will open the customer's browser to the link you specified.
Add https://support.softwarekey.com/ or any valid URL to the Support Website edit box. When there is a value for the Support Website, the activation dialogs will show a "Click here for support" link that will open the customer's browser to the link you specified.
Instant Protection PLUS 3 filled in the Product Purchase Link from the data during synchronization. The default purchase URL was retrieved during synchronization and will create a new shopping cart in SOLO Server containing the selected Product Option. The Product Purchase Link can be modified to open the browser to a URL of your choosing, such as landing page on your website that lists the different options a customer can purchase.
Click Next.
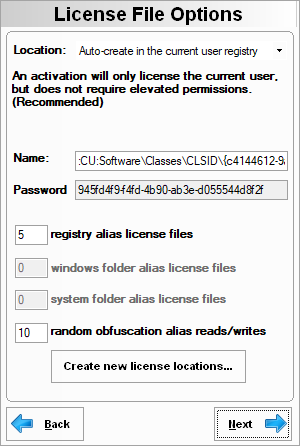
The is a binary encoded file created when the user first runs your application, or it can be created when wrapping and distributed with your application. This file will contain your application's license status as well as many other settings. We will leave the location of the license file at the default value "Auto-create in the current user registry". By selecting this option, an activation will only license that particular named user, not every user on the machine. This option does not require you to ship a license file with your application, and also eliminates the need to set elevated permissions when first opening the license and alias files due to the Windows UAC. When the protected application is first run, the license file will be created in the user's registry under HKEY_CURRENT_USER. Instant Protection PLUS 3 will automatically create the path in the registry and the license file. You can modify this path if needed, but most users will not need to change it. The License File Password is the key used to encrypt and decrypt the license file. Instant Protection PLUS 3 will create a random GUID for this value.
An application can utilize multiple license files. The first file opened is the primary or master license file. Multiple synchronized backup copies, or aliases, of this primary license file can be scattered on the user's system to prevent trial re-installation to gain more time. If the user were to restore from backup or delete a license file to attempt to gain additional use of your trial, one of the alias files can automatically restore the correct license information and defeat the hacker's tampering attempt. Leave the remainder of the settings at their default values. These settings control how many alias license files will be created and synced with the main license file.
Click Next.
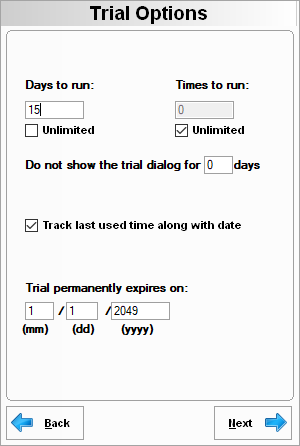
For our trial, set the days to run to 15. When a user first runs the protected application, the countdown of trial days will begin. Once 15 days have passed they will no longer have the option at startup to evaluate the application and will be presented with only the options to purchase and activate. This satisfies our first requirement from Step 1: "The application will start as a 15-day trial".
We will leave the rest of the options as they are.
Click Next.
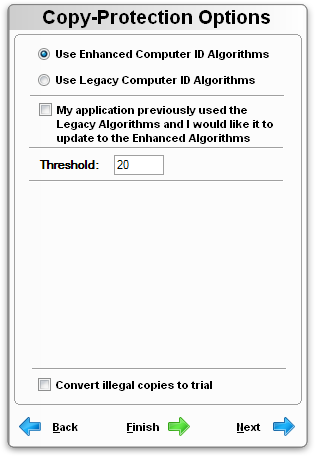
allows us to lock the license to a computer based on a hardware information. Leave the selection on "Use Enhanced Computer ID Algorithms". Once the protected application is activated, a "hardware signature" is stored in the license file. At each start of the application the hardware signature is created from the current PC's configuration and compared to the signature in the license file. If they do not match then the license is invalid and the user must activate with a valid license in order to run the application. This prevents a license being copied from an activated computer to another computer in order to circumvent the licensing as the hardware signature of the second PC will not match what is in the license file. This satisfies our 4th requirement from Step 1: "The application will be copy-protected".
Click Next.
Manual activations happen when a customer calls a support telephone number to get activation codes or sends an email. Manual activations are not required when using SOLO Server, but we will allow them for this tutorial. You may modify the "Text displayed on activation dialog" to include the proper number and/or an email address. Leave the rest of the options at their default settings. This satisfies the last part of our 2nd requirement: "The application will allow online and manual activations".
Click Next.

The Activation Options allow some customization once an activation is processed. Here you can customize the message displayed if the activation succeeds or fails. Change any of the text you like and leave the other options at their default settings. This satisfies the rest of our 2nd requirement: "The application will allow online and manual activations".
Click Next.

We are not using License Key Injection.
Click Next.
We are not using Periodic Expiration in this tutorial. Normally, this is where you would set the options when you want your product to have a subscription license.
Click Next.
The are how we configure the frequency the protected application communicates with SOLO Server in order to validate the license. Using these options allow the remote deactivation of a customer's license.
For this tutorial, check to "Validate with server every" and set the value to 1 runs. You may uncheck the next box to validate by days, but it is not necessary.
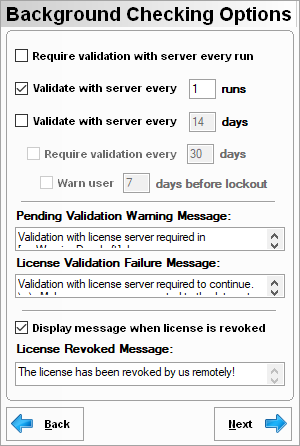
Checking the license with SOLO Server may be excessive and can cause a small delay at the application start up while it communicates with the server. If you do not have a splash screen already in your product, it is a good idea to use the Instant Protection PLUS 3Splash Screen option as it will help mask the start up delay.
Modify the "License Revoked Message" as you see fit. Here, we modified it to "The license has been revoked by us remotely!". This satisfies our 5th requirement: "The application will validate the license online with every run".
Click Next.